Sunday 17 June 2018

Father's Day Card


Today is a card I made for my Dad for Father's Day. 

The main topper is from Digi Stamp Boutique.  I recently came across this website and it has some fantastic images.  I am not one for stamping and colouring so like pre-coloured digi stamps.

I began the card with the topper then decided on the background after.  I often use this style of layout but instead of a horizontal rectangle behind the main image, I used a banner as I thought this looked a little more "masculine". 

To get my layout and sizes, I used the software for my Silhouette Portrait.  This means I can play around with the sizes and positioning before I start cutting. 

I cut out the main square mat with the machine, I then used a digital paper from Silhouette called "Dad" by Digital Pink Ink. 

For the banner and mat, I used a file by Lori Whitlock again from the Silhouette Store. I used Navy card for the main banner and the internal offset is Sky Blue Card.  Both from Papermill Direct.  I would have preferred a mustard coloured card for the internal offset but unfortunately I don't have any.

For the frame to the Topper, I used Sue Wilson's Pierced Squares.

The Topper is from Digi Stamp Boutique, called Special Dad - Circle.  I printed this and then gave it a spray of Pearl Diamond, a glitter varnish by Crafter's Companion.

For the embellishments, I used the star dies from Sara's Signature Just for Men Collection,  The bow is a memory box die which I then added some of the stars to.  I also gave them a spray with the Pearl Diamond and gave the two larger stars a quick layer of clear glitter from the Spectrum Sparkle Pen. 

This card was quick and easy to do once I had decided on my layout. 


Dad by Digital Pink Ink - Silhouette Design Store - Design ID #42679
Banner by Lori Whitlok - Silhouette Design Store - Design ID #20957

Topper by Digi Stamp Boutique - Special Dad -Circle - https://www.digistampboutique.co.uk/catalog/special-circle-p-1407.html

Pierced Square Dies by Sue Wilson for Creative Expressions.

Bow Die - Memory Box "Crisp Bows" 98197

Stars Die - Crafter's Companion Sara Signature Just for Men "Superstars"
Glitter Varnish - Crafter's Companion Pearl Diamond
Sparkle Pen - Spectrum Noir Sparkle, Clear Overlay

Navy Card - Papermill Direct
Sky Blue Card - Papermill Direct

Sunday 20 November 2016

First attempt at a Shaker Card

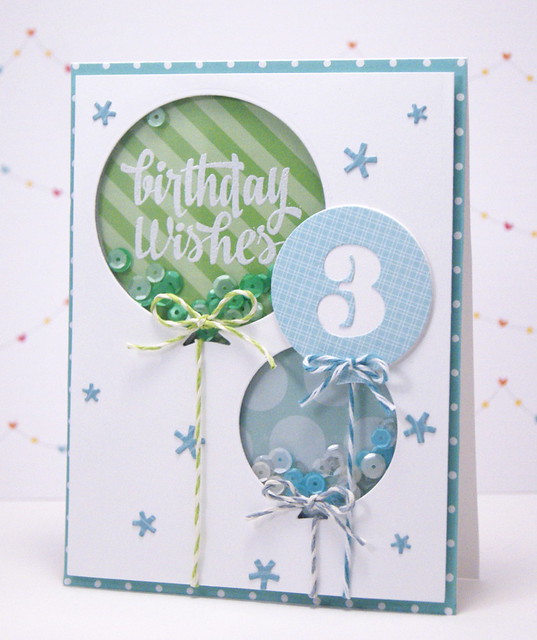
I enjoyed writing about my card yesterday so much that I am back  writing about my next card!  I made this card for my Niece’s 3rd Birthday which we celebrated in mid-October.  The Card was from my Dad.  I LOVED making this card except for the slight problem with how it looked at the end. C’est la vie!  However, I got some excellent comments from a facebook group and now know where I went wrong.

Again, this was another card where it is very similar to one from Pinterest which I liked so much.

Here is my card


Here is the card I got my inspiration from:-

Link to the card is:-  

http://mypaperjourney.blogspot.co.uk/2014/06/june-avery-elle-release-blog-hop.html

So thank you to My Paper Journey, Crafts by Yainea.  Her Card was made with dies but I knew I could make it with my Silhouette Portrait.

I began with the card blank.  It is from a pack of 6x6 cards and envelopes from Crafter’s Companion.  However, to my annoyance it is the envelope which is 6x6, not the card, which I always think is a bit of a swizz!  I therefore measured the card base. 

I then used my silhouette Portrait to make the card.  I made up a rectangle in my software and made it ½ inch smaller either side.  I purchased a balloon shape from Silhouette.  It is #78308 Balloon by Jillibean Soup. 

I was aware that I would need to add a balloon with 3 on it and also have the largest balloon big enough so that my stamped sentiment would fit on to it. I played around with the sizes of the balloon on my mat on the software until I was happy with the placement. 

I cannot remember which font I used for the number 3.  Hopefully by doing this blog I won’t loose these details again!

I cut out my main balloon page and then using gold glitter card that I buy from B&M’s, I cut out my 3 balloon. 

Then came the tricky task of assembling the shaker.  I glued acetate to the back of the card.
I then heat embossed my sentiment to the largest balloon.  Using my MISTI stamping tool and sentiments from Crafter’s Companion Sentimentals range – Birthday and Female.  I used my Versamark to stamp and Papermania Gold Embossing Powder.

I then put a lot of foam tape around the 2 balloon shapes.  I added my sequin mix (Gilded Rose by Lucy’s Cards) on to both of the balloon shapes than stuck on a piece of patterned paper.  The paper was from my stash and I can’t remember what collection it is from. The sequin mix is no longer available but there are plenty of other gorgeous sequin mixes on the website.

This was actually straightforward and I was very happy with myself at this point thinking how easy shaker cards were to make!

I had cut a mat from white card to place my topper onto and then onto the card but didn’t like the look  of the white on white.  I then used some gold washi tape to cover the edges of that card and taped my topper on.  This is where it went a bit wrong!  I had put tape all around the back of my topper and it stuck to the mat absolutely fine but it looked a bit wavy.  I have since been told I should have used foam tape all around my topper not just around the shapes.  It just never occurred to me to do that.

I then put the number 3 topper on using 3D Collal Glue Gel, tied some yellow twin around the balloons and dotted on some card candi. 

The card did not look too bad on the mantelpiece and I am sure my 3 year old Niece did not notice when she was giving it a good old shake!  My oldest Niece has her 5th birthday this week and I am going to make another shaker card and hopefully learn from my mistakes!!

List of Supplies

CRAFTER’S COMPANION:-
 6x6 White Cards & Envelopes
Sentimentals A6 Clear Photopolymer Stamp - Greetings – Female (https://www.crafterscompanion.co.uk/sentimentals-a6-clear-photopolymer-stamp-greetings-female.html)
Sentimentals A6 Clear Photopolymer Stamp - Greetings – Birthday (https://www.crafterscompanion.co.uk/sentimentals-a6-clear-photopolymer-stamp-greetings-birthday.html)

SILHOUETTE AMERICA
Balloon by Jillybean Soup.  Design ID #78308

B&M STORES
Gold Glitter card.  In a pack with 4 other colours

LUCY’S CARD’S
Gilded Rose sequin mix (no longer available)

CRAFTWORK CARDS
I used Marshmallow Candi, but can’t remember the name for the other Candi’s that I used (http://www.craftworkcards.co.uk/3374/marshmallow-candi/)

PAPERMILL DIRECT
White Card


Saturday 19 November 2016

Blogging about my first Card!

Hi, this is my very first card post. I thought I'd begin a blog mainly to help me remember how I made a card and remind myself of any mistakes.  If anyone wants to post helpful comments, I am all for it!  I've been making cards for a few years but only make a few so my knowledge/experience is not extensive.  I spend more time browing pinterest/facebook than I really should!!

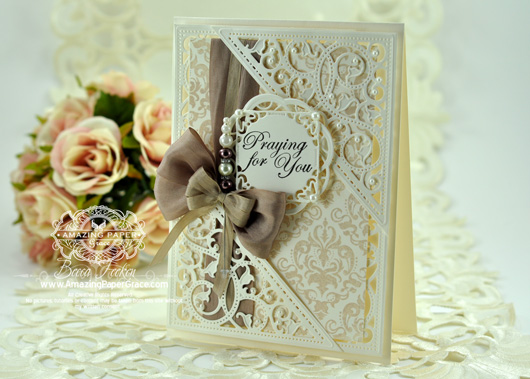
Here is a card I made for my best friend Joanne's birthday.  The inspiration is from Amazing Paper Grace.  The Second Card is made by Becca Feeken.  As you can see my card is very, very like hers!


WRBF-3786-2012
Here is a link for the original card :-
http://www.amazingpapergrace.com/in-love-with-damask/

I love Becca Feeken's site and take lots of inspiration from her.  She is also one of the culprits that has me spending too much money on craft supplies!

Back to my Card.  My colour scheme was purely down to what I had in my craft supplies.  I only have a few inks that I would use for stamping and from there the decision was made!

I used a Memento Dew Drop "Sweet Plum" to stamp the sentiment.  The sentiment was from Justrite "Birthday Wishes For You" CL-04740.  I used Spellbinders Labels 20 to cut out the sentiment.  I then backed this on to a die cut from Sue Wilson's Portuguese Lisbon Die.  

For the Corners, I die cut 2 of the Triangles and the inner die from Spellbinders Gold Elements One.  This was a bit difficult to cut.  I used my Grand Calibur and I had to rotate them and pass them through the machine a number of times for them to cut properly.  But it was worth it!  

The Layer beneath them was stamped with Justrite Damask Wallpaper Background.  I love this die but could have used a number of Justrite's Backgrounds for the card. I used my Memento "Sweet Plum" again to stamp.

I then wrapped a piece of plum double satin ribbon around the stamped layer.  The ribbon is from a stall at Garston Market in Liverpool  Madeleine has a great selection of offcuts of ribbon at great prices.

Here is where I differ from the APG's card.  I decided against cutting another 2 triangles from the Gold Elements One and use an embossing folder instead.  I used Spellbinder's M-Bossabilities 5x7 Venetian.  It gives a lovely emboss and I did contemplate popping some gilding wax or distress ink onto it but decided to keep a clean look.

I matted the card topper on to 2 sheets of card.  The mats were a 1/4 inch bigger than the topper.  

I was going to cut down my A5 card base so I didn't have to do too many mats and layers, but the offcut from my Lisbon die fell on to my card base as I was clearing away and I liked the way it looked!  

I then added some flowers I have bought from Ebay. The White flowers are White Mulberry Paper Poppies and the purple flowers are petite paper Rose Buds. I contemplated a bow instead of flowers but I am a bit rubbish with bows and love Paper Flowers!!

I did add a paper inset with a verse which I foiled with the Heidi Swapp Minc Machine, but forgot to take a picture!!

All the card used was from Papermill Direct.  I used their Rich Cream Plain Card, Rich Cream Linen Card and Maroon Plain Card.

I was really pleased with the card and it looks much better standing up than lying down.  I think if I made it again, I was add some 3d foam tape to the triangles as they are a little wonky due to being placed over the ribbon. Or if anyone has a suggestion, I am all ears! I should have added some pearls and meant to, but completely forgot.

I hope my friend enjoys the card, she is very supportive of anything craft related I do and is a great cheerleader.

Thanks

Sarah xx


Follow my blog with Bloglovin